

Putting your Back Pain to Bed
Im often faced with patients that are suffering from lower back pain for one or other reason. Part of my usual advice is on how to find a comfortable position so that you can get a decent nights rest…
Sleep is an integral part of the bodies ability to heal, so when you are being kept awake due to pain, you often feel worse, your nervous system is more “on edge” and you are generally more miserable from this. As a result, you feel more pain and then cant get the sleep you need. Its quite a vicious cycle…
So to start with, the basic principles of getting some decent shut-eye is to place the least amount of strain on the lower back. By that i mean having the back in a “neutral” position where it is neither rotated nor over extended/flexed.
So here they are:

TOP LEFT- Lying on your side with a pillow between the knees. The height of the pillow does matter here. If you lay with both knees bent, then a small pillow should fill the “gap” between your knees, however if one knee is bent and the other is straight (TOP RIGHT), a bigger pillow is required. You could also place a soft pillow or rolled up towel under your side to fill the gap between hip and ribs.
Or try lying on your back with 1-2 pillows under the knees (BOTTOM LEFT). If this doesnt help alleviate your pain, then up to 4 pillows (BOTTOM RIGHT) can be used to get comfortable. This helps flatten the lower back and also reduces the stretch normally placed on a muscle connected to your spine (iliopsoas).
So there you have it, and I hope it helps you get a good nights rest!
Ric@PhysioPRO
BY: Riccardo Vaccaro
Back injuries

Balance is the key
Ankle injury is arguably the most common sport injury. I tend to see a lot of patients coming into the practice complaining of repetitively “twisting “ their ankles. They will frustratingly announce ”that’s my bad ankle…I’m always twisting it” upset that they can’t seem to shake off the injury.
 Most of the time the reason for these continuous ankle problems, is a history of inadequate rehabilitation, especially in the aspect of balance and proprioception. Proprioception being the sense of knowing where a body part is in space, which is commonly lost after spraining an ankle. So if this is not properly re-taught, the patient is more likely to re-injure that same ankle when they return to sport.
In the initial returning to sport phase ankle braces and strapping can be used to add additional support as well as aid in proprioception of the ankle.
Exercises such as standing on one leg and trying to balance, progressing to closing your eyes while standing on the injured leg as well as standing on an unstable surface such as a balance board will all help improve your proprioception and balance.

Once you are comfortable with these more basic exercises you can now progress to more sport specific balance exercise. Focusing on keeping your balance while performing movements’ specific to your sport, the exercises are limitless.
The problem being most patients, once the pain is gone, stop there and don’t continue with the full rehabilitation program. So if you want to prevent those recurring nagging ankle injuries remember balance is the key.
Andrew@PhysioPRO
BY:
Ankle injuries / Foot injuries / General Health/Fitness / Lower Limb injuries

Sorting out your Shoulder- Part 2
In my last article on sorting out the shoulder, I touched on the importance of scapula positioning in shoulder injuries. In today’s post, I will discuss the relevance of this to shoulder mechanics and some tips to resolve it.
The scapular plays a vital role in shoulder movement. Lets just say that if your scapular couldn’t move on your chest wall at all, you would have less than half of the movement in your shoulder as what you do right now.
With many people developing rounded shoulders and upper backs (as a result of poor posture, bad sitting habits and certain sports), the scapular position on the chest wall is compromised.
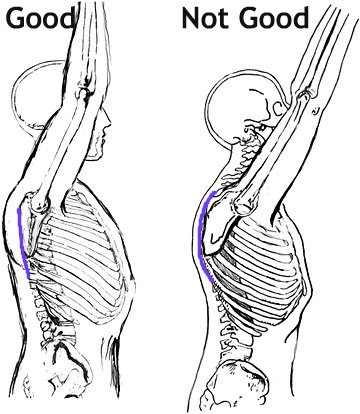
In these cases, the scapular tilts forwards and up (called protracted) and as a result, certain movements (especially overhead) become limited or painful. In addition, the stiff upper back further limits overhead movement and together, this can easily result in a condition called Impingement Syndrome, and/or lead to a rotator cuff tear.
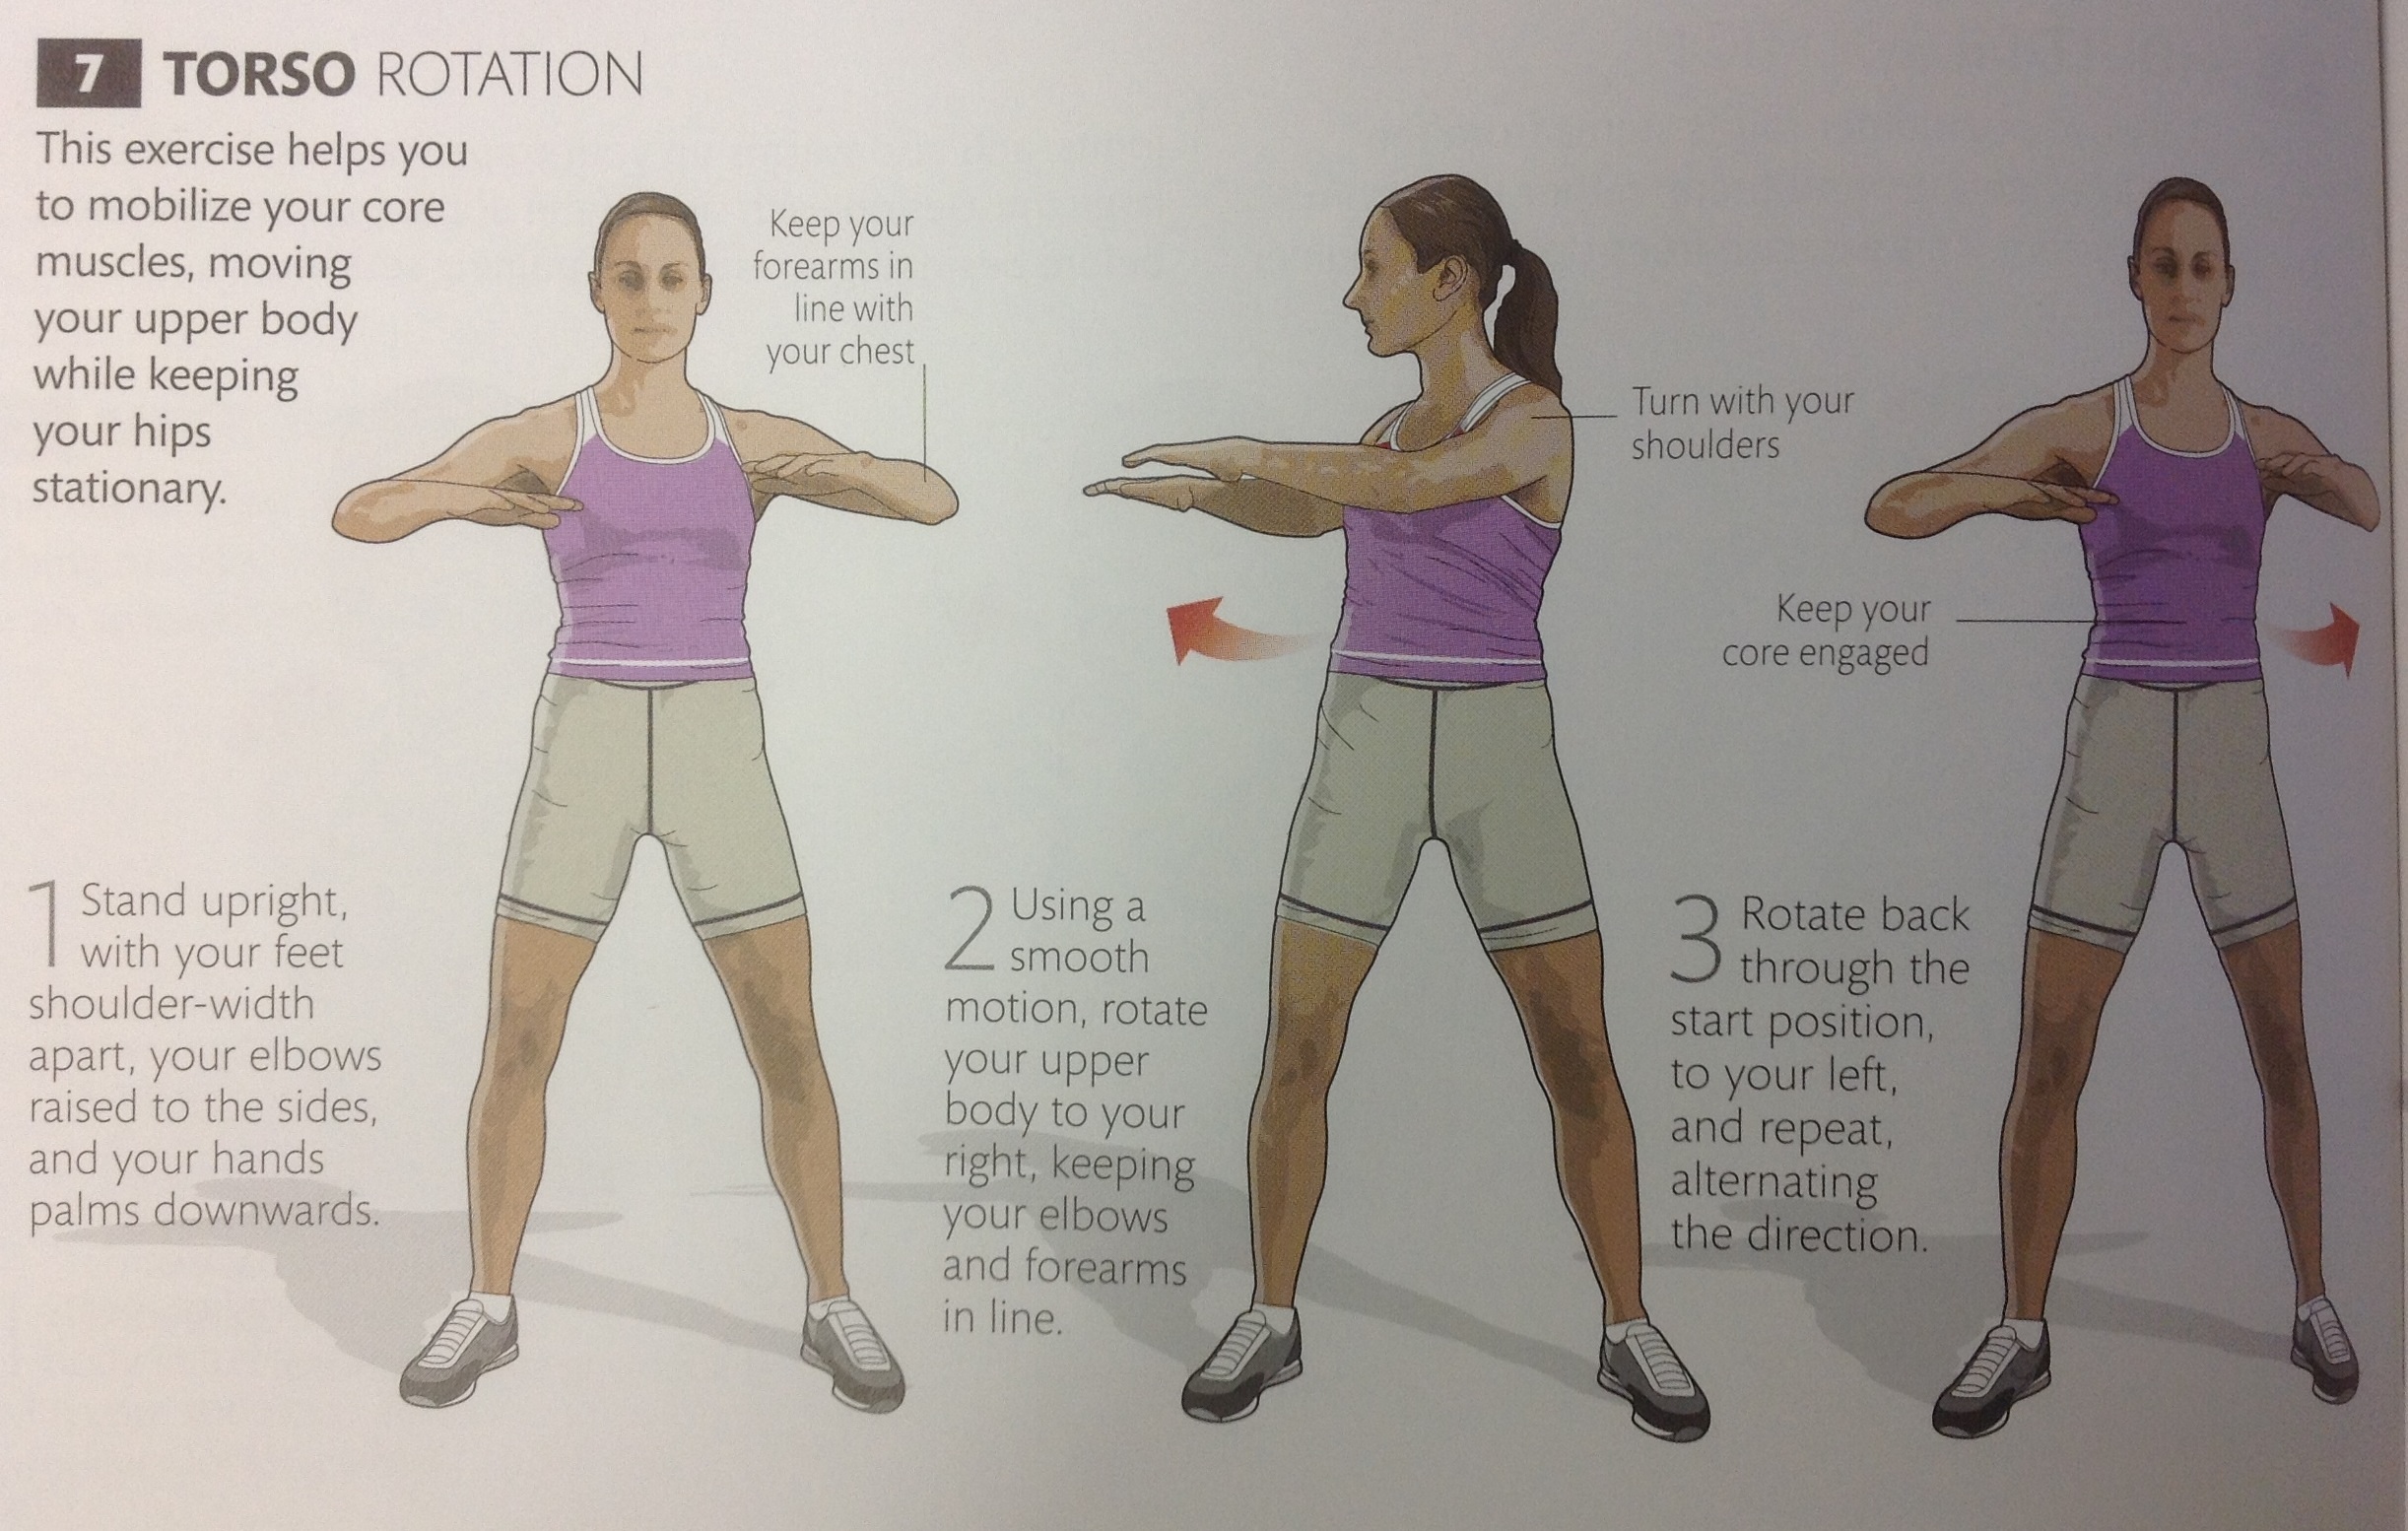
So the first trick is to loosen up or ” mobilize” the upper back.
Below are 5 exercises to mobilize the thoracic spine.


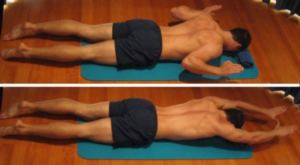
Then we need to address scapular position. This can be tricky, because its not as simple as pulling your shoulders back together (Adduction). The movement is more of a small downward roll and is known as “setting the scapula”. If done correctly, the muscles between your shoulder blades SHOULD NOT WORK (Bottom right of pic below). Again, this is tricky, but once you have been shown it once it becomes simple.

So if you do any overhead sports or weight lifting (Crossfit athletes-this is a must) make sure you work on these two areas and it should help prevent future problems.
Good luck
Ric@PhysioPRO
BY: Riccardo Vaccaro
Shoulder injuries / Upper Limb injuries

Prevention is better than Cure
I’m sure many of you out there have heard of the acronym “RICE” which is used by athletes all over the world post acute injury. Where the R = Rest, I = Ice, C = Compression and the E = Elevation. One other very important letter can be added to this acronym which can have a huge impact on the athletes sporting career and well being…that letter is P…changing the acronym to “PRICE” with the P representing Prevention.
If we can prevent or at least minimise an athlete’s potential for injury our work as sports physiotherapists is half done.
The International Federation of Associated Football (FIFA) recognized this and developed an injury prevention warm up program known as “FIFA 11+” mainly to prevent ACL (Anterior Cruciate Ligament) tears. The program is divided into 3 Sections:
- Part 1: focusing on slow speed running exercises with active stretching and player contact.
- Part 2: Six sets of exercises each with 3 levels of difficulty focusing on core and leg strength, balance and plyometrics.
- Part 3: Moderate to high speed running exercises combined with planting/cutting movements.
To download the full program please visit the FIFA 11+ site http://f-marc.com/11plus/home/
Things to remember: you need to be 14 yrs and older to start using the FIFA 11+ program and always use proper technique during all of the exercises, focusing on your form and posture.
For a prevention program to be beneficial it needs to be done at least twice a week and the exercises should be sport specific focusing on plyometrics, balance and strengthening.
So till next time remember…Prevention is better than Cure!
Andrew@PhysioPRO
BY:
Knee injuries

Sorting out your Shoulder

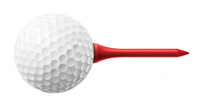
Your shoulder joint is the most unstable joint in your body. If your hip joint is likened to a ball sitting in a socket, then your shoulder joint is likened to a golf ball sitting in a tee…its can slip out quite easily. This is because we need to be able to move our shoulders in a wide arc of movements (think bowling a ball, swinging from a branch or even just reaching to scratch your back), but this increased mobility comes at a price.
As a result of a very “shallow” joint surface, the muscles around your shoulder joint need to be very strong in order to hold the joint in place. These muscles are known as your ROTATOR CUFF, a group of 4 muscles, all working synergistically to hold the joint in place. From the picture below, you can see how they pretty much “pull” the ball of the humerus into the scapula.

The problem occurs when one of these Rotator cuff muscles get damaged, either through a sudden injury (like a tear) or through gradual overload (tendinosis). Because they all act as one unit, when as individual muscle is injured, the balance is upset and leads to further injury or loss of movement.
Another common Rotator cuff pathology is something called Impingement Syndrome. This is where the tendon of Supraspinatus becomes impinged or “pinched” in the groove it travels through. A major cause of this type of problem is as a result of poor posture. If the scapular is sitting more forward than it should (i.e. if you have rounded shoulders), the entire mechanics of how the shoulder joint moves is affected and can result in impingement.
Making sure your rotator cuff is strong and that your scapular sits in the correct position is half the battle won against treating AND preventing shoulder injuries.
So what do you need to do?
As you can imagine, being such a complicated joint, each individual needs to be given a specific set of exercises to improve shoulder stability and prevent injury. The basic process is STRETCH, STABILISE and STRENGTHEN.
Below is a general program that will assist most individuals:
STRETCH
 Hold each stretch 30 seconds
STABILISE
 Hold each position 10 times 10 seconds
STRENGTHEN
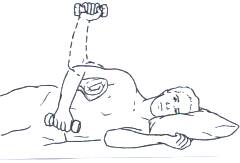 Side lying external rotation 3 sets of 15 (1-5kg)
 Can also be done in standing with a band (3 sets of 15-20)
 Also done at 90 degrees for throwing athletes and weight-lifters
Till next time, stay strong…
Ric@PhysioPRO
BY: Riccardo Vaccaro
Shoulder injuries / Upper Limb injuries
ITBFS – Iliotibial Band Friction Syndrome
Lateral knee pain (pain felt on the outside of the knee) is a common problem especially among long distance runners and cyclists.
The most common cause of lateral knee pain is probably iliotibial band friction syndrome (ITBFS). Other causes include lateral meniscus abnormalities, patellofemoral syndrome, biceps femoris tendinopathy (one of the hamstring muscles) and superior tibiofibular sprain. In some cases the pain could even be referring from the lumbar spine.
With so many possible causes of lateral knee pain, it is vital to make the correct diagnosis by
a) looking at the mechanism of injury – in other words how you hurt yourself
b) looking at the activity that brings on the pain
c) having specific tests done by your physiotherapist
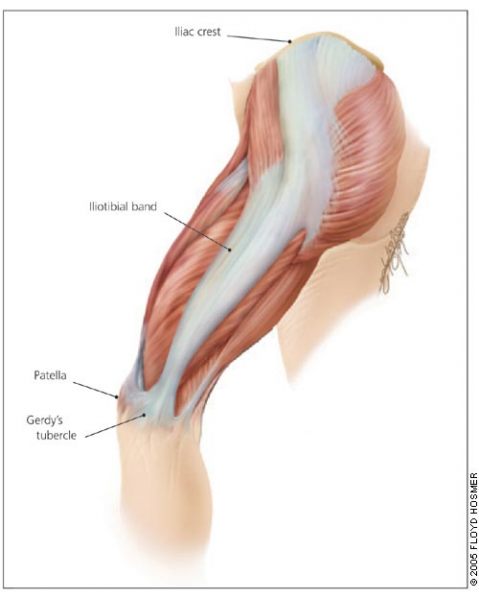
Your Iliotibial band (ITB) is a lateral thickening of the fascia surrounding your thigh. Proximally at the hip the tensor fascia lata muscle inserts into the ITB, as does a portion of the gluteus maximus muscle. Distally the ITB inserts onto the patella and tibia. Thus you can see by its attachments that it plays a role in lateral stability both at the knee and the hip joints.
The ITB has many functions
- Stabilising the pelvis in stance
- Flexion (bending), abducting (moving to the side away from the body) and medial rotation (turning inwards) of the hip
- Stabilising the knee in extension (when its straight)
- Lateral rotation (turning outwards) of the tibia on the femur
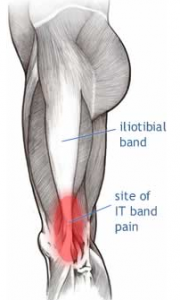
Iliotibial band friction syndrome (ITBFS) is an overuse injury presenting as lateral knee pain that is exacerbated by sporting activity. Tenderness is elicited over the lateral femoral epicondyle which is 2-3 cm above the lateral joint line of the knee. The pain often develops at the same time or distance during the aggravating activity. A change in training methods or shoes, longer training and downhill running are often aggravating factors.
Obers test (which would be done by your physiotherapist) would reveal ITB tightness and quite possibly the patient would have tightness and shortening of the tensor fascia lata and gluteus maximus musles, which as discussed earlier, are attached to the ITB.
Treatment with ice and electrotherapy or corticosteroid injection should not only be focused locally on the lateral knee but foot and hip biomechanics should be looked at for more favourable long term results. It has been shown that runners with ITBFS can have significantly weak hip abductors in the affected limb, so focusing on correcting the underlying weakness and fatigability in these muscles is quite important. Myofascial release of the ITB, tensor fascia lata and gluteal muscles as well stretching these muscles is very beneficial. Dry needling and use of a foam roller may also be recommended.
The last resort – if all conservative management fails – is surgery. But before you decided to go under the knife visit your physiotherapist and see if they can’t provide a solution that works for you.
Andrew@PhysioPRO
BY:
Knee injuries / Lower Limb injuries
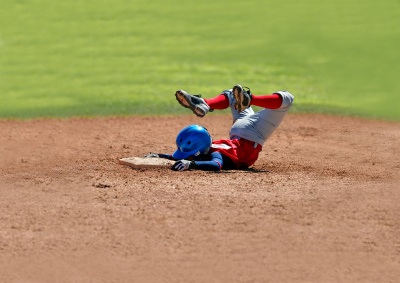
Sports Injuries in the Younger Athlete!
In today’s competitive sporting environment, children are being placed under increasing pressure to excel at their sport. Schools and clubs (not to mention parents) invest a lot of time and money developing their children into athletes, and it is quite common for youngsters to be exercising in excess of 20 hours per week!
Although exercise at an early age has numerous health benefits, it also involves the risk of injury, and in children, unique risk factors means unique injuries…

Due to the structure of growing bones, injuries in children differ from those of their adult counterparts. For example, due to the “elastic” nature of long bones in children, these bones tend to “bend” and split rather than break, resulting in what is known as a Greenstick fracture (see above). The end-plates of long bones (where the growth occurs) are susceptible to “shifting” under large loads or fractures, which given their location, often affects the overall growth of these bones.
Where an adult might develop a tendon problem with overuse, children are more likely to develop a traction apophysitis, whereby the bony attachment point of the tendon is “pulled’ away from the bone.

This usually occurs at the attachment site of large, powerful muscles such as: the elbow (Panner’s Lesion), the Hip, the knee (Osgood-Schlatter’s Lesion and Sinding-Larsen-Johansson Lesion) and the Ankle (Sever’s Lesion).
These injuries are usually due to the repetitive nature of some of the sports that children play (think about how many times a young, fast bowler, will practice his bowling action) leading to repetitive stress of specific tissues.
We commonly see shoulder and elbow overuse injuries in throwing sports (cricket, baseball, water polo etc), stress fractures of the spine (e.g. tennis, fast bowlers) and stress fractures of the lower legs (runners and dancers).
Faulty technique, lack of adequate recovery, poor flexibility and muscle weakness are some of the most common causes of these injuries and they can be prevented to a large extent. This highlights the need for Sports Injury Screening at schools, as it is often during such testing at schools and clubs that we have been able to identify and correct problems, before they become injuries…
Ric@PhysioPRO
BY: Riccardo Vaccaro
General Health/Fitness

Achilles Tendinopathy
The Achilles tendon is made up of the combined tendons of the gastrocnemius and soleus muscles (the two calf muscles). It is the thickest and strongest tendon in the body. But, that doesn’t make it immune to injury. Even the legendary Achilles – amongst the strongest and bravest Greek warriors – met his untimely demise following an injury to his Achilles tendon.
Injury to the Achilles tendon occurs when the load applied to the tendon exceeds the ability of the tendon to withstand that load. It is most common among males aged 30-50. These over-use Achilles tendon injuries may arise with increased training volume or intensity, change in training surface or footwear or decrease in recovery time between training session.
An athlete’s biomechanics might also predispose them to Achilles tendinopathies. These biomechanics include excessive pronation or supination of the foot (where the foot tends to fall inwards towards the arch or be pushed outwards), calf weakness and altered tibial or femoral mechanics etc.
Most of the time the athlete will notice a gradual development of symptoms, complaining of morning stiffness and pain, which diminishes with walking and application of heat. The two common sites of pain are the midportion of the Achilles tendon and the insertion of the Achilles tendon at the calcaneus.
One of the first things to look at when treating these problems is to identify and correct any predisposing factors i.e. training methods, footwear, orthotic and biomechanical correction.
Once these have been addressed the athlete should commence an eccentric training program, where they focus on controlling the negative motion of the repetition i.e. where the muscle is working in a lengthened state. The Alfredson painful heel-drop protocol for Achilles tendinopathy has shown to be very successful in treating midtendon Achilles pain. It consists of two main exercises – the ‘gastrocnemuis drop’(knee fully extended) and the “soleus drop”(knee bent to 45 degrees). Both exercises start on a step with the calf in a raised position. From this position the patient slowly lowers the heel so that the foot is parallel to the ground. Patients should do 3 sets of 15 repetitions twice daily for 12 weeks everyday of the week.

Patients should not be put off by the fact that the pain may worsen at the start of the program as this is part of the normal recovery process. If a patient experiences no pain during the exercises, they are advised to increase the load until the exercises provoke some pain i.e. add a weighted backpack. If you are suffering from pain at the insertion of the Achilles tendon then you should do a similar exercise program but remove the step, just do it standing on the floor, as this has been shown to be more effective.
With the correct treatment approach and the guidance of your physiotherapist, Achilles tendinopathy can be successfully managed and overcome.
Andrew@PhysioPRO
BY:
Ankle injuries / Foot injuries / Lower Limb injuries

A MUST-DO stretch
Now before you start panicking, NO, we are not going to be doing the stretch you see above, but we are going to show you a REALLY important stretch…
Most people are aware of the importance of stretching, and we have covered the topic on the benefits of stretching in an older post that you can read here, but what I would like to focus on today is the importance of stretching your HIP FLEXORS. As a Physiotherapist, I consider this muscle group to possibly be the most important muscle group to stretch, as it not only affects athletic ability but also your posture, and subsequently, chronic pain.


First for some anatomy. Your hip flexors are comprised of 3 distinct muscles namely: Iliacus, Psoas Major and Rectus Femoris (bet you probably never heard of them?).
Iliacus and Psoas Major (often grouped together and called Iliopsoas) are pure hip flexors (bringing your knee to your chest), whilst Rectus Femoris is a hip flexor and knee extensor (as it crosses both the hip and knee joint).
If you have a look at the first picture above (left), you will notice that the Psoas muscle is attached to the lower part of your spine. Thus, if it is tight, it actually pulls your spine down and exaggerates the curve of your lower back (anterior pelvic tilt). Together with the other two muscles being tight, this can account for “hyperlordosis” and lead to lower back problems and pain.

So why do they get so tight? Surely if you are not exercising these muscle, there is no reason for them to become overly tight?
There are two main causes for this. Firstly, we sit way too much, and secondly, we all like to have a six-pack, so if we do get a few minutes to exercise, we tend to do sit ups…
Now I’ve said it before, “Humans were just not designed to sit all day long!”, so for the majority of people that sit most of their day, these hip flexor muscles are in their shortened position for hours on end, and as a result, they become shortened and tight. Then when you do finally stand up, they are “fixed” in this position.
The second point was on sit ups and most other stomach exercises. Most people don’t realize this, but if you do a standard sit up (i.e. lying on your back, knees bent and then curling your back to bring your chest to your knees), your hip flexors are doing about 70% of the work…. Whether you bring your chest to your knees, or your knees to your chest, its the same movement– HIP FLEXION! (on a side note, thats the reason a lot of people get lower back pain when doing sit ups-tight hip flexors).
So here come the Rescue Remedy:
Its called many different names, but we like to call it the PROPOSAL STRETCH- for obvious reasons

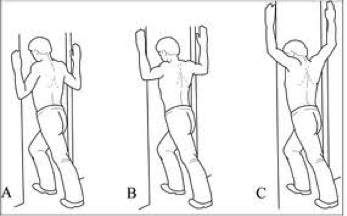
I teach 2 different ways of doing this, either as you see above (more effective as you are bending the knee as well, so you are also stretching Rectus Femoris), or by placing your back leg on a chair (below). If you are doing it right, you should feel the stretch in the front of your hip, and possibly also slightly on the front of your thigh. People that do a lot of squatting movements (Crossfit, gym, skiing etc), or lunges (squash, tennis etc) would benefit immensely from this stretch, as It could limit your ability to get into those positions.

Hold this for 30 seconds and repeat for 3 sets, at least 2-3 times a day (more if you are sitting all day long).
Happy Stretching
Ric@PhysioPRO
BY: Riccardo Vaccaro
Back injuries / Hip injuries / Lower Limb injuries