

Shoes in Sport
Of late, many a client has passed through the door with injuries stemming from incorrect training shoes. Conditions such as: Shin splints, plantar fasciitis, tendinopathies, stress fractures and overuse syndromes may be as a result of the this…
Shoes play and important role in our lives as we wear them most of the time is our daily activities. But how do I know what the right shoe is for my sport?
This is a quick go-to when having a look at which shoe is best suited for you.
Firstly you need to purchase a shoe that is in line with the activity you are performing.
Walking shoes: lightweight, with extra shock absorption in the heel and under the ball of the foot to decrease heel pain and burning/tenderness in the ball of the foot. Walking shoes are more rigid in the frontal area of the shoe for toe roll off. If you feel that you need more even weight distribution, a smoother transition from heel-to-toe and less force over the foot, look for a shoe that has a slightly more rounded sole.
Running shoes: have good overall shock absorption, and heel control. Check your running style first, as a heel-striker requires different shoes to a fore-foot/mid-foot striker!
Aerobic conditioning shoes: lightweight with extra shock absorption in the ball of the foot to prevent foot fatigue.
Tennis and netball shoes: give upper support with quick transferring of weight and side to side movements and a flexible sole for quick changes of direction. When playing on soft surfaces look for a softer sole shoe, and vice versa with a hard surface.
Basketball shoes: have a stiff, thick sole for more stability whilst on court. The high top gives extra ankle support but won’t prevent the risk of ankle injuries.
Cross training shoes: a combination of many features and therefore help you participate in more than one sport, without having to purchase more than one pair of shoes. It will be flexible in the forefoot for running and have lateral control for aerobics and court activities. Obviously, because they are the “jack of all trades” when it comes to functionality, they are not particularly good at any one specific component. For exmple, a cross training shoe shouldnt be worn to run more than 10km. Rather get a dedicated running shoe for that purpose.

How to go about choosing the correct shoe.
-Like clothes- different brands fit differently, so don’t take it for granted that if in the one brand you are a size 7 you would be the same in the next brand.
-Measure both feet when they are at their largest- usually after exercise or at the end of the day. Remember one foot may be larger than the other.
-Use the same type of sock that you would usually use in your activity of preference.
-Comfort is key- the shoe should mimic the shape of your foot
-There is an old saying- “the shoe will become flexible/ loosen with time” this is partially true, however when purchasing a shoe, you should not keep this in the back of your mind. The shoe should be comfortable and fit correctly when purchasing it!
-The widest part of your foot should not feel cramped in the shoe, you should be able to wiggle/ move your toes freely
-The part where your toes are in the shoe (toe box) should have enough depth to prevent chafing, or calluses formation
-Stand and ensure that there is about half the width of your finger between the big toe and the second toe.
-Test the shoe, walk around in it, and ensure that it is comfortable with no chafing. Your heel should not slide forwards and backwards either.
 Some extra tips
If you participate in a particular sport 3 or more times a week, then a sport-specific shoe is advised.
Shoes need to be replaced depending on how often they are used and age. It is recommended that after 300 hours of aerobic activity, or a maximum of 800km have been reached on the shoes, they have run their course and need to be replaced, much like the tyres on your vehicle. Rubber degrades with age, so a shoe that’s more than 5 years old, regardless of mileage/hours still needs replacing!
These are just a few pointers in helping you find the right fit for your foot. So the next time you head out to upgrade your footwear to what your feet deserve, stop and think before you just choose a brand and type of shoe because of its aesthetic appearance. Choose FUNCTION over FASHION!
Happy shoe shopping!
Amy@physiopro
BY:
Ankle injuries / Foot injuries / General Health/Fitness

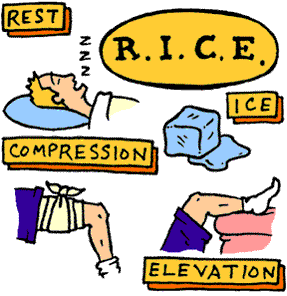
Acute injuries- RICE or MEAT?
Things are constantly evolving in the world of sports medicine. With a better understanding of how the human body works, comes an ever changing understanding of how best to treat it. One such notion which needs to be challenged is the age old acronym of R.I.C.E (Rest, Ice, Compress, Elevate) used for the management of acute injuries.
The “Rest” part of this strategy may in fact cause delayed healing and muscle atrophy. Several studies that have compared early PAIN-FREE movement to complete rest have shown decreased healing times and improved pain.
As I stated above, what is quite important is to start moving early on, but specifically without pain. Even some serious injuries/operations should allow for a degree of movement that is pain free.
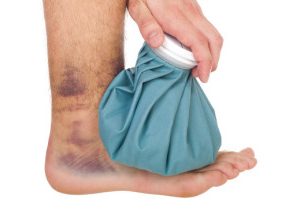
Another area of uncertainty is the application of “ICE”. Whilst there is evidence that ice causes a numbing effect on tissue (by decreasing the speed and transmission of nerves), thereby reducing pain, the notion that icing decreases the inflammatory response and speeds up healing is being challenged.
Some studies are showing that the application of early ice (for 20 minutes in the acute stage of an injury) may in fact reduce the healing potential of tissue, and cause longer term negative effects on the healing collagen. So if your intention is to reduce pain, then ice may be appropriate, but if you think you are assisting the body healing process, think again…

What is now being suggested is a new acronym – M.E.A.T
MOVEMENT – as discussed earlier, must be pain-free
EXERCISE – the correct exercises done early on have been shown to reduce muscle wasting and improve outcomes
ANALGESICS – used to control acute pain, but be careful not to “mask” the pain so you can go back to activity too quickly. Again, avoid anti-inflammatories at first.
TREATMENT – from a Physiotherapist or other sports medicine practitioner. We can use other modalities to improve circulation and assist healing.
The Editor in Chief of The Physician and Sports Medicine Journal was quoted as saying,”Do you honestly believe that your body’s natural inflammatory response is a mistake?” I’ve said it in my article on anti-inflammatories, the first stage of healing is INFLAMMATION, but it seems we have all been hell-bent on trying to stop this.
It would appear that the more we learn about how to heal the human body, the more we realise it does a pretty good job, all on its own!
Ric@PhysioPRO
BY: Riccardo Vaccaro
Ankle injuries / General Health/Fitness / Knee injuries

We will, we will SHOCK you!!
Shock wave therapy (also known as extracorporeal shock wave) is a cutting edge form of treatment in the world of sports medicine. Its a very similar technology to that used to “blast” kidney and gallstones, and does not involve electrical shocks (don’t panic, this isn’t the dark ages) but rather mechanical pulses, similar to sound waves.
Although the physiological mechanism of how exactly this mechanical pulse works is still not fully understood, the research shows us that the “waves” cause microtrauma and inflammation, stimulating the formation of new blood vessels and nerve cells, and speeding up healing of tissue. There is also a positive effect on reducing pain through a pain gate mechanism.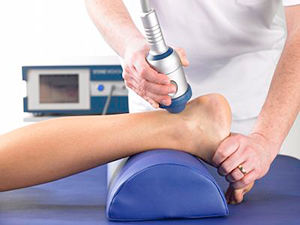
In other words, it improves blood supply and speeds up tissue regeneration!
So why is this so amazing you ask?
Well basically its taking something the body would normally do on its own, and speeds it up significantly, without the need for injections or surgery. Numerous medical research reports have shown that shockwave therapy can be 80-90% effective at completely and rapidly resolving injuries within 3-6 applications.
The most significant application in sports medicine is in the treatment of chronic tendon, muscle and joint conditions. So things like:
- Tennis elbow/ Golfers elbow
- Rotator cuff tendinopathy
- Frozen Shoulder
- Trochanteric Bursitis
- Hamstring tendinopathy
- Achilles tendinpathy
- Patella tendinopathy
- Plantar fasciitis
- Muscle knots and trigger points
- ITB friction syndrome
- Chronic ligament pain
- And even more conditions are healing in weeks instead of months…
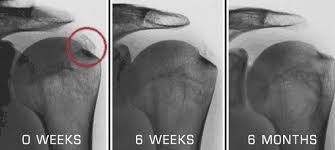
It is particularly effective in breaking down the calcification of tendons, commonly seen in the shoulders, as can be seen in the x-rays below…
As technology and techniques improve, so will we find new uses for shock wave therapy. In fact, I chatted to a Doctor at one of the top SA rugby teams, who said they use shock wave to treat nearly all injuries on their players and are getting fantastic results.
Already studies show that in bone fractures that either wont heal quickly, or at all, the application of a single shock wave treatment was effective in causing fracture healing in 87% of patients.
It also has applications in the healing of diabetic foot ulcers, treating cardiac chest pain and erectile dysfunction…but don’t come to me for that!
So if you, or anyone you know has one of the above conditions, give us a call to see if Shock Wave Therapy might be the treatment for you…
Ric@PhysioPRO
BY: Riccardo Vaccaro
Ankle injuries / Elbow injuries / General Health/Fitness / Knee injuries / Shoulder injuries

Increase your running distance safely
How to safely increase your running distance
With summer just around the corner, most people have started getting ready for their beach body. You may have taken up any number of sports to achieve this, but certainly, the most common “seasonal sport” is running. Running is a relatively cheap, easily accessible sport, but if you are not careful with how you increase your distance it could turn into a costly exercise…
Most runners have heard of the 10% rule. This states that you should never increase your distance by more than 10% from the previous week. This “rule” has not been validated by science and a recent article published in the Journal of Sports and Orthopaedic Physical Therapy, revealed some interesting findings.
The study followed 874 novice runners for 1 year and gave each runner a GPS watch to track their distance. Based on their weekly running increase, they were placed into one of three groups: less than 10%, 10%-30% and more than 30%. In total 202 participants sustained an injury over the course of 1 year and what will surprise most is that the total number of injuries per group were not much different.

Yes, there was an increase in the number of distance related injuries in the group that increased by more than 30% compared to the group that increased by less than 10%. So injuries like patellofemoral pain (runners knee), iliotibial band syndrome, medial tibial stress syndrome (shin splints), gluteus medius injury, greater trochanteric bursitis, injury to the tensor fascia latae, and patellar tendinopathy (jumpers knee) were more common in the group that increased training distance by more than 30%.
A possible explanation for this is that when you increase your distance, your running speed decreases (especially if you get fatigued). If your speed decreases, you have to take more steps to complete a given distance and the increased number of steps equates to increased “wear and tear”.
However, this was not true for all injuries. Injuries like plantar fasciitis, Achilles tendinopathy, calf injuries, hamstring injuries, tibial stress fractures, and hip flexor strains were just as common in all 3 groups. These injuries may be linked to running pace rather than distance, and its only through more research that these answers will be revealed.
So, all that science can presently advise is that you progress your weekly distances by less than 30% per week over a 2-week period.
Train smartly!
Ric@PhysioPRO
Article by Rasmus et al, titled “Excessive Progression in Weekly Running Distance and Risk of Running-Related Injuries: An Association Which Varies According to Type of Injury” J Orthop Sports Phys Ther 2014;44(10):739-747. Epub 25 August 2014. doi:10.2519/jospt.2014.5164
BY: Riccardo Vaccaro
Ankle injuries / Foot injuries / Hip injuries / Knee injuries / Lower Limb injuries

Lower Back Pain
Lower Back Pain…Where is it coming from?
Lower back pain is a common injury seen at my practice, both in the sporting and non-sporting population. There are multiple pain producing tissues of lower back pain (muscles, facet joints, ligaments, fascia etc) however, two of the most commonly affected tissues are the disc and nerve. This short article should give you an idea of the difference in symptoms between the two structures.
What is the disc?

The Intervertebral Disc, is made up of two different tissues…On the outside, we have a thick, tough ring called the Anulous Fibrosus, and on the inside, we have a “jelly-like” material called the Nucleus Pulposus. The disc sits between two vertebral bodies and is not a true “joint”, but acts as more of a shock absorber and allows for one vertebra to move on another. I often tell my patients to imagine a thick layer of jam between two pieces of hard toast. If you squash the toast on one side, the jam gets pushed out the opposite side. For example, when you bend forwards, the jelly inside gets squashed and moves backwards, allowing the two vertebra to move, but not “collapse”.

The problem occurs when we put too much loading through the disc, and then force the jelly in a certain direction. A typical example of this is when you bend over to move a heavy box and then you are unable to stand up straight due to the pain in your lower back. The position of the jelly combined with the added weight of the box causes the jelly to be forced backwards and it pushes into the outer ring (see images 1 and 2 below).
This is referred to as a DISC BULGE and can be compounded by a small amount of wear-and-tear of the outer ring (small tears and cracks with ageing). Symptoms of a disc bulge include a broad “band” of pain across the lower back (and sometimes into the buttock) as well as sharp pain with changing positions (sit to stand). Coughing and sneezing are often painful (due to the increase in abdominal pressure, pushing the disc material out further). Usually these disc bulges heal well with physiotherapy techniques (we try to gently squeeze the damaged tissue back in) and anti-inflammatories, and depending on the extent of the damage, can take anywhere from a few days to a few weeks to heal…

If the injury is more severe, we speak of a DISC HERNIATION (Image 3- it has now broken through the outer ring) OR DISC SEQUESTRATION (image 4- part of the jelly has “broken away”). At this point, the inflamed disc and its material often starts to push on the nerve exiting the spine, and now we also have NERVE ROOT IMPINGEMENT.
This is usually accompanied by pain, numbness, weakness and pins/needles of the affected nerve root (pain usually radiates down a part of/or the whole leg), and the pain in the leg usually outweighs the pain in the lower back. These injuries take longer to heal and conservative therapy does have a high rate of recovery, however surgery is sometimes needed.
A nerve can also get trapped where it exits the spine through a little opening called the foramen. Generally this happens in older patients with arthritic degeneration, where the opening becomes narrower due to extra bone formation, enlarged joints and narrowed discs. This produces similar symptoms of pain, numbness and pins/needles but generally, the symptoms gradually appear and get worse with time.

Hopefully this helps you have a better understanding of whats going on in your back.
Ric@Physiopro
BY: Riccardo Vaccaro
Back injuries

Exercising for Knee pain
In May 2012 I wrote an article on “The risk factors in knee pain”. In this article I discussed a study which showed the relevant risk factors in developing ANTERIOR knee pain, or otherwise known as Patello-Femoral Pain Syndrome (PFPS). You can read the article by clicking HERE.
In this study, one of the five risk factors that were found to be associated with PFPS, was “STRENGTH”, specifically that of the Quadriceps muscles which straighten your knee. Some of the advice then given was to strengthen your quadricep muscle through exercises such as squats and resisted knee extension.
Now, in a more recent study which examined the amount of strain placed on the Patello-femoral joint (knee-cap) during different exercises (squats and knee extension), researchers were able to conclude that there are “safe” ranges of motion during these exercises as well as “unsafe” ranges, which would either place a little or a lot of strain on the Patello-femoral joint.
: 
Results:
What the above image demonstrates is that during a squat movement, the “safe” range of motion is between 0 and 45 degrees of knee bending, and the “unsafe” zone from 45 to 90 degrees of bend. So when performing a squat to strengthen the quadricep muscle in PFPS, ONLY GO HALF WAY DOWN!
However, when performing a seated knee extension exercise, the “safe zone” is from 45 to 90 degrees, and the “unsafe zone”, 0 to 45 degrees of bend. So when performing a resisted leg extension exercise, ONLY GO HALF WAY UP!
By training in the “safe” zones for both of these types of exercises, you can strengthen your quadriceps muscles and at the same time, avoid feeling knee pain. If you are already experiencing pain under your knee cap, always consult your Physio prior to starting these exercises. Once you can do these exercises pain free, your Physio will progress them accordingly.
Ric@PhysioPRO
Article by Powers et al, titled “Patellofemoral Joint Stress During Weight-Bearing and Non–Weight-Bearing Quadriceps Exercises,” J Orthop Sports Phys Ther 2014;44(5):320-327. Epub 27 March 2014.doi:10.2519/jospt.2014.4936
BY: Riccardo Vaccaro
Knee injuries / Lower Limb injuries

Practical Tips for a diabetic patient starting a physical activity program
There are two types of diabetes … Type 1 “juvenile-onset diabetes” and Type 2 “adult-onset” diabetes, both are characterized by diminished insulin secretion in the body resulting in increased blood glucose levels. Type 2 diabetes is a lot more common and as most of you could guess the onset of the disease occurs later in life compared to Type 1 diabetes.
For both Types though exercise and physical activity are highly recommended, but firstly it is very important that prior to any exercise a full assessment by a healthcare professional be performed to identify any possible risks associated with diabetes while exercising.
A combination of aerobic and resistance exercises provides the most benefit to those with diabetes. You should aim to do a minimum of 150 minutes per week of aerobic exercise spread over 3 days such as biking, walking, swimming, hiking etc .
Resistance exercise 2-3 times a week has been proven to improve insulin sensitivity and help control glucose levels in the body. It is also very important to always monitor blood glucose levels before, during and immediately after exercise.
Here are some Nutritional advice while exercising
- Exercise 1-2 hours after eating a meal to ensure ideal glucose levels during exercise.
- Staying Hydrated before, during and after exercise is very important as dehydration can be confused with hypoglycemia.
- Fast- acting carbohydrates should be easily accessible during and immediately after exercise.
Some signs of hypoglycemia and things to be wary of
- Headaches
- Excessive sweating
- Confusion
- Nervousness
- Tremors
- Hunger
- Convulsions
And just to end of this article here is a short list of items you should always have with you while exercising
- Insulin medication
- Fast- digesting carbohydrates
- Medical Id bracelet
- Water
- Glucose monitor
- Comfortable shoes and socks
Andrew@PhysioPRO
BY:
General Health/Fitness

Take this pill-tear that muscle!
So you go to see your doctor because you have the flu. The doctor books you off and prescribes antibiotics. One or two weeks later you start to feel better so you decide to go for a jog, and thats when it happens! Suddenly you hear a loud “crack” and start limping. You’ve TORN your achilles tendon and you weren’t even straining yourself?
This same scenario has happened to many people and its not because they were sick or unfit, its because of the ANTIBIOTIC that was prescribed!!!

A group of Antibiotics called Flouroquinolones are associated with a wide variety of musculoskeletal problems that affect muscle, tendon, bone and cartilage. They are commonly used to treat a variety of urinary tract, digestive, respiratory and skin infections amongst others. In the USA, this class of antibiotic is THE most prescribed type to adults, even though since as early as 1983 it was known that this drug was toxic to musculoskeletal tissue. Symptoms have been known to occur as early as 2 hours after the initial dosage and as late as 6 months after!!
In one study of 42 patients who developed Tendon related problems, 76% experienced tendinopathy (sick tendons) and the other 24% had complete ruptures of the tendon. Muscle symptoms range from mild muscular pain to a very serious and life threatening condition known as Rhabdomyolysis. Bone problems are less conclusive in humans, but in animal studies, it has been shown to slow down or even stop a bone from repairing itself.
What they have discover in more recent times is that there are factors which make you more at risk of developing these symptoms. These include: increasing age, use of cortisone, playing sport, a previous history of tendon or joint problems, magnesium deficiency and diabetes to name but a few.
So what should you do or how can this be avoided?
Not to discredit any Doctor or other health professional, but if you are being prescribed an anti-biotic, check with them that this will be safe to use, especially if you are a physically active person. I had a patient recently that developed general muscle ache, along with severe elbow pain for no apparent reason. She had all the symptoms of someone that had trained heavily the past few days, which she hadn’t. She also had Tennis elbow symptoms and it turned out she was prescribed a Flouroquinolone by her dentist for a tooth infection the week before…
So your doctor should get a thorough history of your previous musculoskeletal problems, find out about your activity levels, ask about associated risk factors and advise you to stop the drug immediately if it is causing any symptoms.
If you are an Athlete, you should definitely not be using this class of antibiotic unless there is no available alternative drug. If you are presently taking this drug, or have used it in the past 6 months, reduce your training intensity, avoid ballistic movements and be aware of any development of symptoms.
Ric@PhysioPRO
Full article by Hall et al. Published in the American Academy of Physical Medicine and Rehabilitation, Vol 3. 132-142, Feb 2011.
BY: Riccardo Vaccaro
General Health/Fitness

Modified Shoulder Stretches
Sometimes just by modifying the position or way you perform a stretch slightly, you can have much better results and outcomes. So when I came across an article about two modified shoulder stretches, I just had to share it with all of you.
Two of the most commonly used shoulder stretches to increase the flexibility of the posterior soft tissues are the cross-body and sleeper stretch exercises. But, based on the inability to stabilize the shoulder blade and control glenohumeral joint rotation with the cross-body stretch and the potential for subacromial impingement with the sleeper stretch, it has been recommend that modifications to both of these commonly performed stretches be made.
The modified sleeper stretch is performed with the athlete in a sidelying position, trunk rolled posteriorly 20° to 30°, and shoulder elevated to 90°. In this position, the athlete passively pushes his forearm down towards the bed using the opposite arm, a towel may also be placed under the arm of the stretched limb. This modified sleeper stretch position puts the posterior structures of the shoulder under more tension thus making it more effective.
 The cross-body stretch is often performed with the athlete in an upright standing position, using the opposite hand to horizontally adduct the targeted shoulder (pull your arm across your body).
This method has the disadvantage of not providing stability to your shoulder blade and allows excessive external rotation of your shoulder. Due to this optimal stretch of the posterior shoulder is not achieved. Therefore, to better stabilize the shoulder blade, it has been suggested that the athlete be in a sidelying position, and, to restrict external rotation of the shoulder,the athlete should align the forearms together with the opposite forearm on top.

Well I hope these little adjustments to your stretching techniques yield large results.
Andrew@PhysioPRO
Reference: Journal of Orthopaedic & Sports Physical Therapy, 2013, Volume: 43 Issue: 12 Pages: 891-894
BY:
Shoulder injuries / Upper Limb injuries